13 Key Questions to Ask an Organizer

Even though the discipline has been around for awhile, professional organizing may be new to you. If you’ve ever considered hiring an organizer, there are some important questions to ask. Any time you’re making an investment and hiring a pro, you want to ensure you’ve found a good match. See below for questions to ask an organizer, along with explanations. If you want the Cliffs Notes version of questions only sent directly to you, provide your email here:

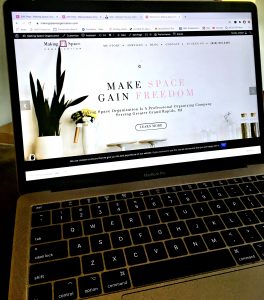
1. Do you have a website?

It’s not necessarily a red flag if someone doesn’t have a website. They can still have a legitimate business. But, on the other hand, a professional website does indicate the organizer is treating organizing seriously, and likely has references to share. Most importantly, a website allows potential clients to see examples of their work, and learn about services offered, process, and pricing.

website screenshot

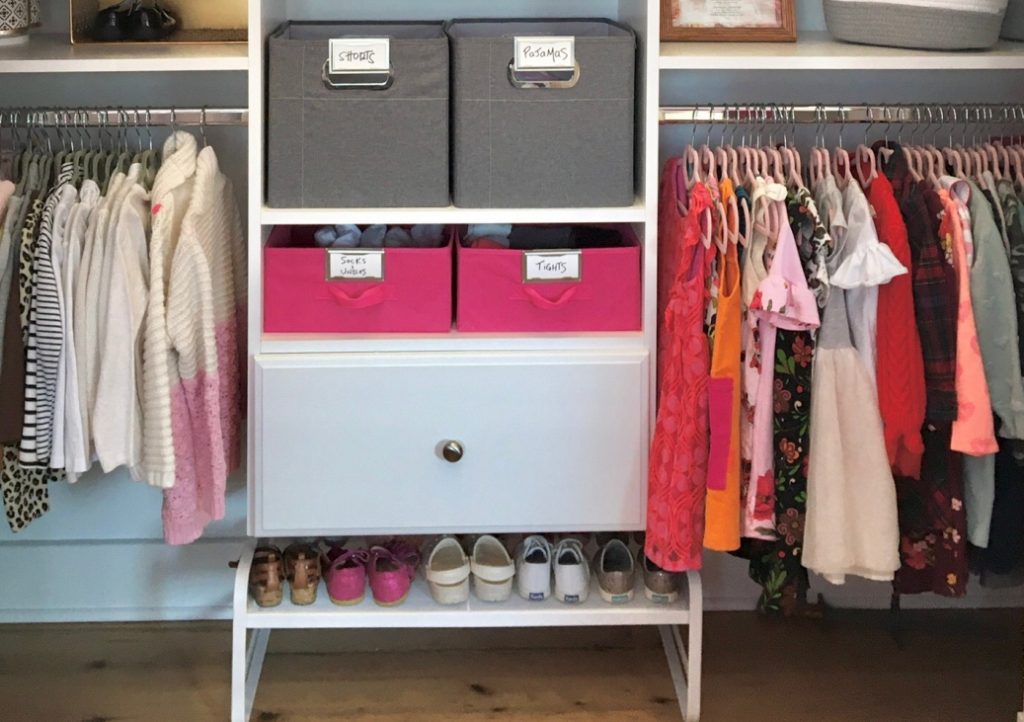
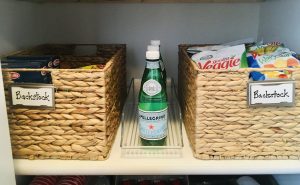
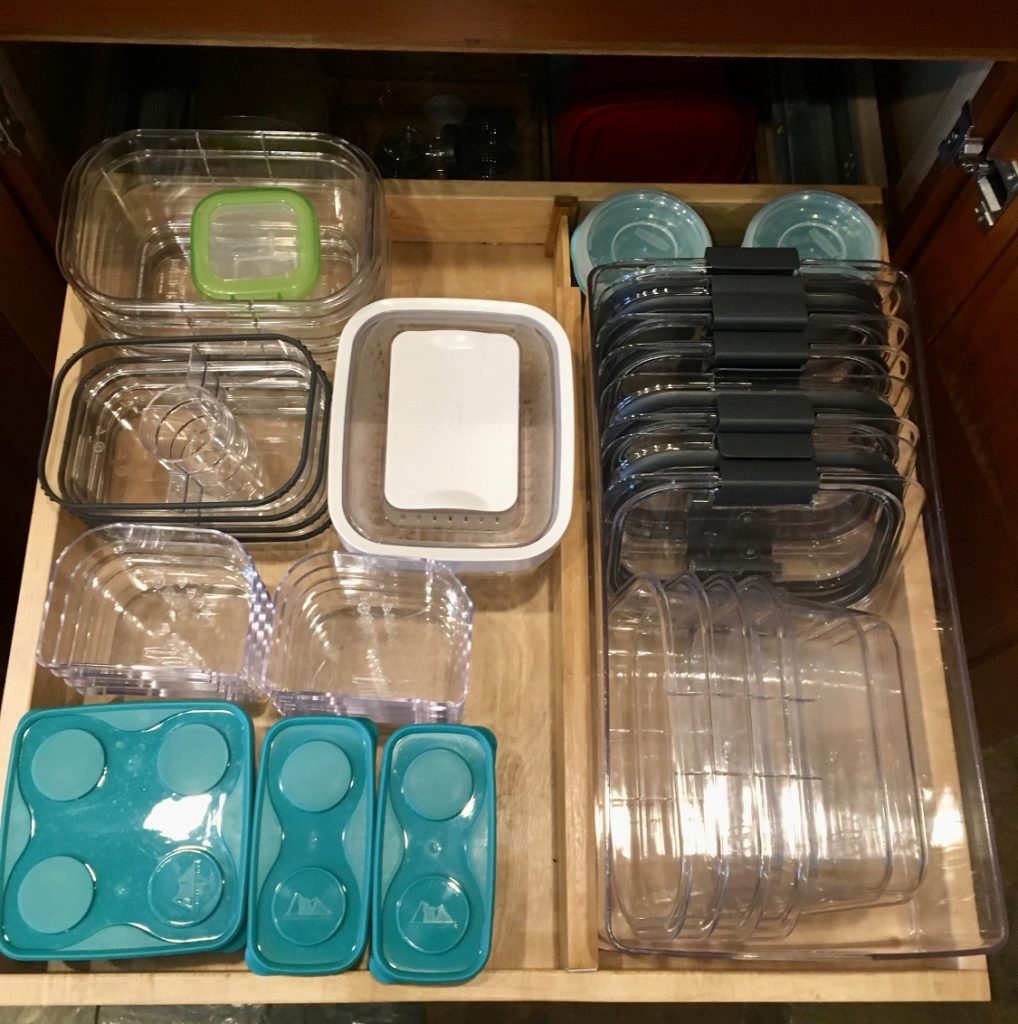
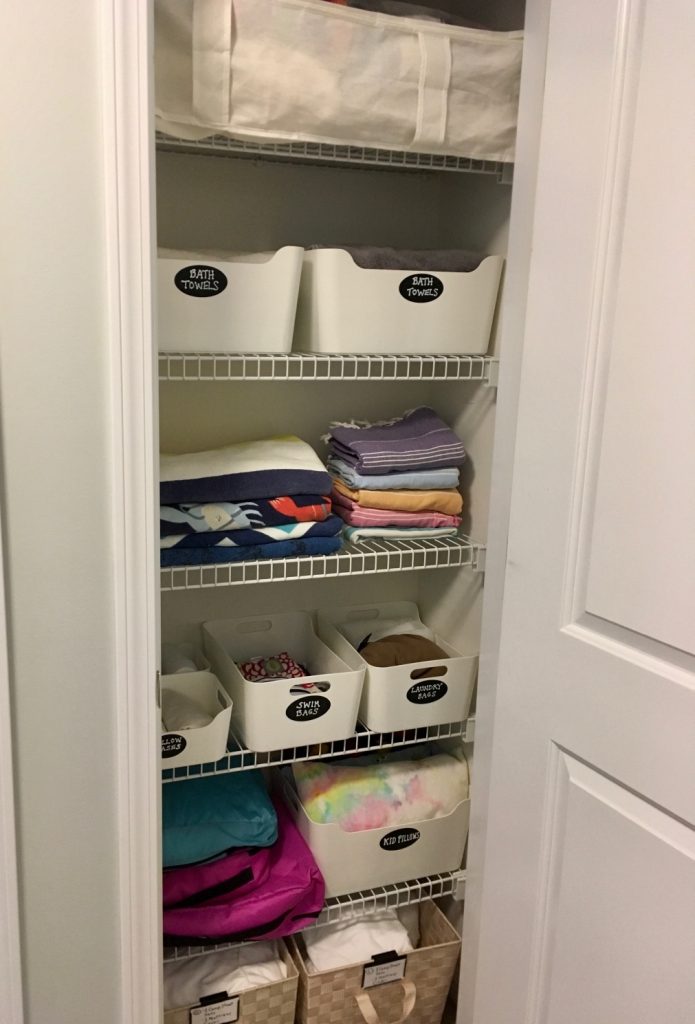
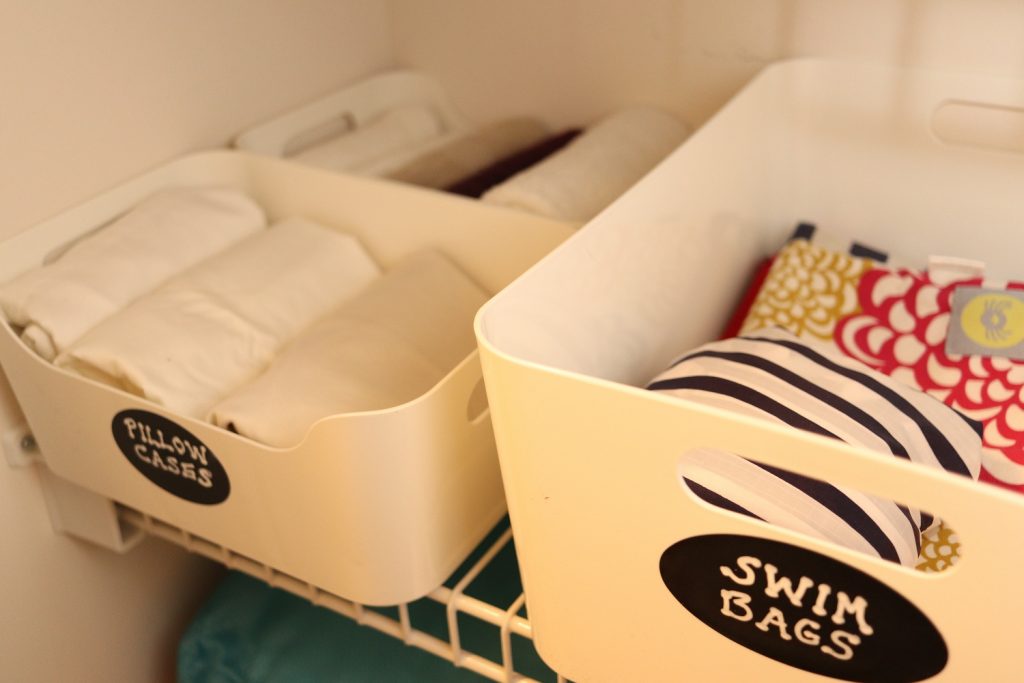
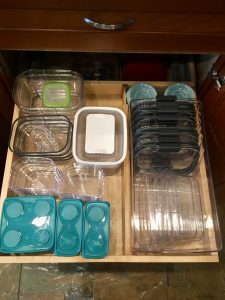
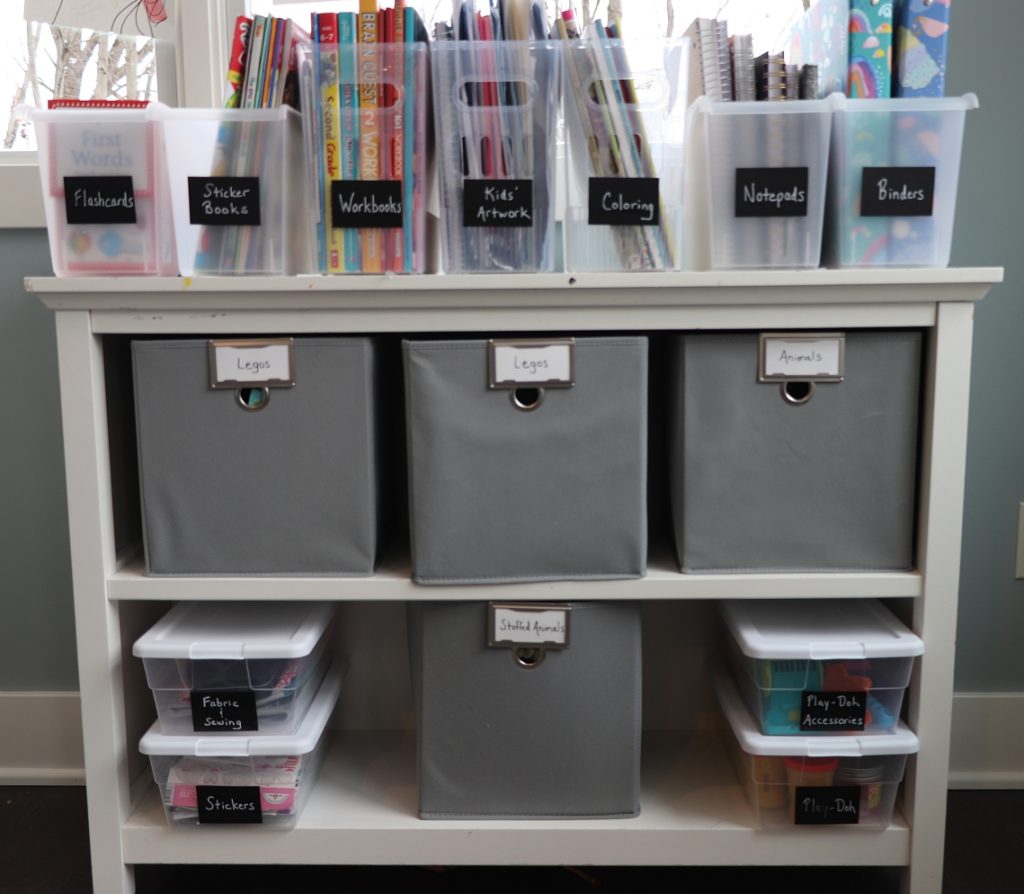
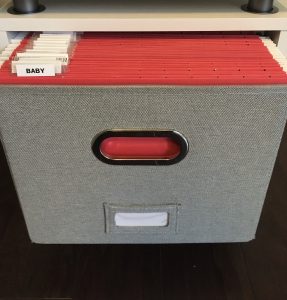
2. Do you have examples of your work?

An organizer should be able to show pictures of what they’ve done. This helps you to get a sense of their style and quality of work.

3. Do I need to be involved in the organizing?

This is great to know so childcare can be arranged, if needed, and sessions can be scheduled for a time when you are available. My answer to this question is…it depends. For areas such as pantries, I work independently. For areas that require decluttering and editing down, those are decisions clients need to make. So, a client and organizer often work together.

4. How long will the process take?

Many organizers provide an hourly rate, and hours accrue until the space is completed. An organizer may provide you with a range of hours so you can get a sense of the scope. Ask if there is a minimum number of hours.

5. How much will this cost?

There are several factors that affect how long organizing can take, which makes it unusual for organizers to offer traditional quotes. And, it’s not done with the wave of a magic wand, despite what organizing reality shows portray…there’s a process! The more an organizer can understand your goals and spaces, the better they’ll be able to give you an estimate of cost. Ask if there are any volume price breaks or other discounts/promos.

6. Do you offer complimentary consultations?

This is an opportunity for the organizer to see your space and understand your goals. Not everyone offers this, but some do, so it’s worth asking!

7. How is payment handled?

payment

Some organizers ask for pre-payment to cover any out of pocket expenses such as product.

8. Should I clean up before you arrive?

Most organizers will prefer to see your spaces in their “usual” states. But, on a related note, when a client tackles some decluttering prior to a session, they can save some money, as it leaves less for the organizer to do.

9. Will you share my name/pics of my home?

My work is confidential, and photos only shared with client permission.

keys to your home

10. Will I need to get rid of things?

Organizers can offer an outside perspective, but it would be a red flag if anyone pressures you or requires you to part with something that you’re not on board with!

11. Will you help with donation removal?

Included in their rate, organizers often load up their car to bring donations to a center.

12. What is your process the day of an organizing session?

Since organizing is a new concept to a lot of people, it’s important for an organizer to partner with their clients and let them know what to expect.

13. Should I purchase products/containers ahead of time?

Organizers all handle product differently, and could potentially use what you have or shop for you.

file folders in drawer

Watch outs:

There aren’t necessarily right or wrong answers to many of the above. But, these answers will give an indication of whether that organizer is a good fit for you. After all, they’ll be in your home, handling your personal items, and trust and rapport are very important.

Trust your gut. If an organizer is rushing through these questions or pressuring you to schedule or pay, try someone else. There will be someone out there for you. Many organizers also offer virtual sessions, so even if they’re not in your area, you can benefit from their expertise.

How to Dig Out When Your House is a Mess

Do you sometimes feel like the baby in the photo? You’re drowning in a messy house and you just want to throw your hands up and cry? I hear you! Granted, what looks to one person like an orderly space might seem chaotic to someone else (and vice versa), at the end of the day, it doesn’t really matter. You know your personal threshold and can sense when you’ve crossed over into that place where there’s so much mess you don’t know where to start. This is for you!

Here’s how to work through a messy home. We’ve all been there, and we can all climb out! The key is preventing (further) overwhelm by starting small, one task at a time. None of these should take any longer than 10 minutes, with the possible exception of the dishes (but that one is definitely worth it, so get after it!) These can be done in any order, but starting with the kitchen is my recommendation:

  1. Do the dishes. This is the single most impactful thing that contributes to feeling like you’re either relatively under control OR living in an out of control mess.
  2. Clear countertops. Consolidate countertop clutter into one area, as a first step. This process alone has a positive mental impact – even if the same amount of stuff is there. Then, in 10 minute increments of time, chip away at handling the piles. Don’t just shift and relocate clutter. You’re making decisions, item by item. Trash, recycle, donate, sell, or put away where it belongs.
  3. Take out the trash. Going room to room with a trash bag, emptying all the trash cans is a great job for a kiddo.
  4. Clean the floors.
  5. Spend 5 min. per room picking things up and clearing clutter.
  6. Start a load of laundry.
  7. Go through one stack of mail.
  8. Open all delivered packages.
  9. Clear the kitchen table.
  10. Ask for assistance. Enlist help from your family, a cleaner, or an organizer.
  11. Keep perspective. Sometimes a messy home is the aftermath of having fun and building memories. Clutter and mess aren’t permanent. And, you’re NEVER past the point of no return.

Approaching the New Year…

Do you make New Year’s resolutions? Or, perhaps you choose a word, an intention or a focus area. This year, my guess is that many people are happy to leave 2020 behind. Yet, it’s a particularly appropriate time to not just kick 2020 to the curb, but to reflect on it. What did you learn that you want to apply to the following year? How did your priorities shift, or solidify? What did you gain greater clarity around?

Here are some thoughts to guide how we can approach our intentions for the new year.

1.Write it down.

There’s so much research supporting the fact that when you write down a goal, you increase the likelihood of achieving the goal. It adds to a feeling of accountability, too, so break out that planner, your phone, a notebook – whatever you have. If it’s on paper, consider posting it somewhere that is visible. This helps to remind us of the commitment we’re making!

writing new year's resolutions down

2. Be specific.

Do you want to “get better at X skill”? Expressed in that way, it isn’t specific, so who knows if it’ll happen?! If, on the other hand, you specifically call out “taking one virtual conference/quarter on the topic of communication”, you WILL get better at communication! That will be the by-product of your intentional, specific steps and focus in that area.

new year's inspirational note

3. Keep it simple.

Having your sights set on something big and challenging is not inherently bad. But, the trouble with resolutions is that they don’t stick, because they’re often too big to bite off at one time. We can’t gain momentum if we never get started!

Another reason to keep resolutions to a manageable level is because resolutions are often things we’ve struggled to gain traction on in the past. They may be areas that don’t come naturally to us, or things we’ve been unsuccessful at in the past. Because of this, we need to be extra kind to ourselves. Keeping it simple means we’ll be more likely to take that first step. We tell ourselves that we really want “that thing” (eating zero sweets all year, for example), but it may not be realistic given where we are today (daily sweets). It becomes a mental barrier that holds us back. Let’s walk before we run.

4. Throw out the rules.

Who says you only can have 1 resolution? Maybe you want to choose 1 thing in each of several categories, such as spirituality, business, parenting, marriage, or self improvement? If you do go for multiple things, though, make sure to keep each of them simple!

5. Put triggers in place.

happy new year sign in blocks

Proactively think about what will help you to keep the focus on what you selected. If you’ve chosen a focus word such as presence, for example, you could put calendar entries on the first of the month for the entire year saying “Reminder – presence” to help you to keep focus on the word. It’s your trigger to think about, and more importantly, take action on your intention.

It’s all too easy for months or even a whole year to fly by, as we get caught up just keeping the wheels on the bus, that we lose sight of what was important to us in the beginning of the year.

6. Consider continuity.

I love the idea of building on a strength, or digging deeper into a concept, year over year. If you like last year’s focus and want to further dive in, go for it! Continue to build on a strength or improve in a certain area, as a thread that connects the previous year to the next one. Whatever your approach, mindset matters, so let’s roll into the new year with an outlook of positivity and an expectation of good.

Find Your Floor

Find your floor…it’s an expression we organizers use when the clutter has been cleared, and the floor (or, more generally speaking, the surface) has been “found”. It has been cleared such that the counter, dresser top, desk, floor, etc. has been revealed, in all its glory. Here are some helpful tips on how to find your floor:

1. Notice

You may have pesky horizontal surfaces covered with clutter that you may not even notice anymore. They’ve just become that place that houses the mail piles or the random items. Look around your home with fresh eyes to notice where the clutter accumulates and what surfaces are waiting to be revealed.

2. Clear everything

Clutter is a magnet for other clutter. We see a pile of stuff and think “Well, all this other stuff is already here, I’ll just add to it”. Start by clearing everything off. Then, really comb through it. What types of items end up cluttering your surfaces? See what can be discarded first. Then, proceed to find homes for everything…somewhere besides the surface they were cluttering.

3. Employ systems

An organizational system is simply a habit, tool, or process that is repeated and helps to bring/maintain order and consistency.

Does your desktop need bins to contain paperwork? That would help you find your floor. One that’s labeled “To Do” and one that’s labeled “To File” is a good start.

Another good system is a place to hang backpacks, accompanied by a habit of the kids putting their backpacks there after school. Often, the simpler the system, the better. It helps ensure longevity.

4. Make it easy on yourself

counter

Finding a home for clutter is a great first step. Another recommended step to aid you in the long term adoption of a new habit (putting things away in their new home) is to physically block yourself from clutter accumulation. That countertop that collected random papers? Treat it as an opportunity to find a decor piece or plant to occupy that space instead. Acknowledge the new purpose. “This is a countertop where this tray and vase stays. The papers get thrown away or filed in the office”.

The clothes that end up on the floor? Get a conveniently placed hamper where you’ll put the clothes instead.

laundry basket

5. Contain

Containers are key! Stuffed animals can go in a large basket instead of the floor. They’ll still be accessible, but they’ll be contained, freeing up floor space for play and room to walk. What other categories of items do you have that warrant their own container? Papers, legos, balls, stuffed animals, and tech are common ones.

6. Adopt a Do it Now Mindset

Why put off until tomorrow what you can do today? Will your tomorrow really have more time just waiting to be filled with putting away…yesterday’s…stuff? Is there a really a better time to handle something than the present?

This do it now mindset, combined with the action of following through, can go a long way. Before leaving a room, glance around to see what needs to be relocated. You’re heading out anyway, so might as well grab the empty coffee mug and return it to the kitchen. When you’re heading up the stairs, bring the laundry with you. These things take no extra time, money, or effort, only a do it now mindset. So, do it now…find your floor!

Simplifying Consumption

Holiday gifts, black Friday, cyber Monday, feasts….it’s the time of year when consumption of all kinds is easy to partake in, often in excess. It’s a time when budgets can be blown and organizational systems can be tested to the max. Of course it’s fine to live a little, yet it’s also helpful to do so while remaining mindful of our consumption and how to keep it simple.

Consuming Media

We are barraged particularly hard this time of year. The lure of a sale, the negativity of politics and divisiveness, the mindless habitual act of picking up a screen to zone out, numb, or distract…none of this is particularly healthy. It may be a good time to put in place some parameters. For example, keeping the phone in the kitchen after 9pm. Or, putting it away when you’re with the kids after school. It’s not for the purpose of enforcing a “rule” on a grown human (yourself). It’s to alter a habit by removing the physical trigger. Try it and see what you discover.

social media sign

I highly recommend the film The Social Dilemma, which explores the consequences of our growing dependence on social media. It’s good food for thought.

You can also simplify by reducing your choices. Go through your apps to delete what you no longer use or need.

Purchasing Local

There are so many fantastic local businesses to support, many of whom may be struggling during the pandemic. It’s all too easy to press a couple buttons on amazon and have something delivered the next day. And, I do my fair share, for sure. But, it’s also great to discover and support local by purchasing a gift or a gift card.

shopper image

Gifting With Intention

Experience gifts are great! Or, keep it simple with a theme for your family, such as homemade gifts or games or books. Other ideas to simplify include drawing names or agreeing on a monetary limit for your purchases. 

It’s all too easy to let gifting for the kids get crazy. Sometimes we, as parents/adults, need to reconcile in our own heads that less is ok, and that we don’t need to worry or feel guilty about disappointing little Sally by not buying everything on her list. A hope of getting all the things does not need to be indulged. You’re the parent and get to decide. What is memorable and meaningful in the long term? Memories are not typically created by playing with plastic stuff. Let intentionality and the true spirit of giving/gifting guide you.

Maintaining Perspective

It’s worth mentioning that I don’t write content driven posts such as this because I’m an expert or have mastered these things. I write them because they’re things I think about, or struggle with, and assume others may be as well. And, to encourage independent thought and action. It’s ok to be different, to be “the only” family that operates the way that feels right to you, without giving into group think mentality or “everybody has this app or plays this game or buys this phone”. I doubt that any of us will ever regret not buying that thing or putting our phones down and being present. It’s an invitation….for intentionality and presence over presents.

8 Strategies to Finish the Projects You Start

Projects and tasks have a natural cadence and flow to them. There’s the excitement of getting started, the messy middle, and the conclusion. Somewhere around the messy middle (literally messy when the project involves organizing) it gets to be… not so fun. You’ve been knee deep for several hours, maybe the kids have been ignored and are vying for attention, our energy is zapped…who wants to push through, much less clean up? It doesn’t have to be that way! Here are 7 strategies that build your follow through muscles so you can finish what you start!

1. Break projects into smaller work packages.

Depending on the size of your project, it may be helpful to break it down into bite sized chunks that can each be accomplished – start to finish, in one session. This helps to prevent the fatigue that can set in when we try to do too much at once. You may only have 15 minutes to allocate to something. That’s ok! Choose to work on something that CAN be finished in that amount of time. Or, if it’s a larger project, do a little bit at a time, day after day. Schedule it in just like you would an outside appointment.

2. Identify and remove obstacles.

What typically prevents you from finishing something? Distraction? Fatigue? Boredom? Overwhelm? Underestimating how long something will take?

If distraction is the main culprit, proactively address this so it won’t be an issue. Keep your phone out of sight, find childcare for the kiddos, or choose a day that’s not too busy so you’ll be able to focus and prioritize this work.

3. Decide you will finish.

finish line

Decide you’re one of those people who follows through and finishes the job! Even if that doesn’t happen all the time, declaring it to be so puts you in the frame of mind to put distractions in their place. To enlist help if you need it. To look forward to celebrating at the finish line!

4. Take breaks and vary the work.

Your project may involve a significant amount of decision making along the way (decluttering, for example – deciding what stays and what goes). This can be taxing, so if you start to feel like calling in the towel, instead try to shift your focus to doing something else that you do have the energy for. If you’ve been accumulating a donate and sell pile, take a minute to do something mindless and run the donations to your car. Or, snap some pics of your items to sell. Then, more often than not, you’ll be re-energized to get back to what you were doing.

4. Do one project at a time.

Sometimes, the very fact that we are simultaneously trying to juggle multiple projects at once – each with its own challenges, opportunities, messes, budgets – can be overwhelming! Well, no wonder! Simplifying and focusing on just one at a time makes us more likely to finish what we start. Then, move on to the next thing.

5. Acknowledge progress.

You demo’d the cabinets? Good for you! It may look messy now, but you’re that much closer to your end goal. Recognize that. Notice it. You went to the store and purchased all your supplies? Fantastic! Acknowledge these micro goals and the part they play in making it to project completion.

6. Don’t compare.

Comparison is the thief of joy, right? You may be comparing to the Pinterest version, or even how you thought it should go, or how far along you thought you’d be by a certain point. We’re our own worst critic! Give yourself a break and know you’re doing your best. Just keep putting one foot in front of the other, and hopefully, when you’re done, you can adopt the perspective that, if nothing else, you persevered and learned something along the way.

7. Be realistic.

If this is a time of life for you where it’s difficult to carve out 5 min. of alone time, much less the necessary hours to allocate to a project, it’s ok to defer something to a later date. Or, if it’s a must have right now, determine what you can delegate or hire out. Another strategy would be to lengthen your timeline to account for slow and steady progress.

8. Keep your end goal in mind.

quote

Sometime we’re simply weary as we inch toward the finish line. That’s a great time to keep in mind your why. There’s a reason you’ve been putting time, energy, and resources into something, right? Because it’s important to you! And, it’ll be worth it in the end!

6 Reasons You Haven’t Decluttered

I can attest to the fact that people do, indeed, pay other people to declutter and organize. Why would they do this? Lots of reasons! Sometimes people simply need an accountability partner, a cheerleader to work side to side with them while they tackle their stuff, in the hopes of getting a sense of order in their home and life.

Regardless of the reason, hats off to people who are reaching out for support in this process. It’s not easy! I love to help people with this journey! Yet, even more than that, I want to equip and empower people to take hold of their clutter, habits, and space so that they can maintain it moving forward. Here are 6 reasons people aren’t decluttering, and how to cut through these mental stumbling blocks so lasting progress can be made.

1. It takes too much time.

clock

As with most worthwhile things in life, decluttering does take time. We’re stretched for time, as it is, keeping kids fed and the wheels somewhat on the bus. I get it. And, I don’t want to make light of these reasons. However…I promise you, making a commitment to declutter is the single most impactful step you can take when organizing. If you didn’t “organize” anything, but you did pare down, that would be progress.

When you’re in a decluttered state, you’re in maintenance mode – a great place to be. A place that does NOT take much time. It takes regularity, but (this bears repeating because I’m sensing you didn’t believe me the first time!), it really does NOT take much time. Make it a priority to do a little every day and you’ll be amazed how far you get. More on this in point #4.

2. It will just get messy again anyway.

Yep, kids, spouse, us!, (fill in the blank) can be messy. But, remember, we’re talking about decluttering – the act of removing the things that are being messed up! So there is LESS to mess up, LESS choices to overwhelm people, LESS to not put away, so you, in turn, have LESS to stress about.

And, even at a very young age, kids can learn where things go, and can learn to put something away before something else comes out.

3. It’s hard…

Decluttering takes time and physical effort. But, even “harder” is that it often entails making decisions about things that are sentimental in nature. It’s easier to leave the pile of inherited china and knick knacks in a box in a storage room. But, that’s no reason to not get after it! It’s so worth it to dive into our clutter, and determine what is special enough to keep, and what can be donated or sold, while tucking the memory away.

4. I don’t know where to start.

which way to start?

This sentiment often includes the prefix “there’s just so much”….thus “I don’t know where to start”. I wrote a blog post with tips on where and how to start. Short answer: It doesn’t matter where. And, start small – one corner, one drawer does the trick.

5. I paid good money for that!

money growing on trees

The money has been spent. It is a sunk cost. Holding on to an item will not un-sink the money that was spent. There is no need to feel guilty over spending money on something that you no longer want to keep. It just doesn’t help. And, maybe you can recoup some money (and bless someone else) by re-selling it. You definitely won’t recoup anything keeping it stashed away. No time is better than the present to let it go.

6. What if I need it again?

Over the years, I have decluttered hundreds and hundreds (probably more!) of my personal items. I can count on 1 or 2 fingers the items I wished I held onto. And, in the grand scheme of things, they were nothing important, and easily replaceable.

The objective isn’t to be carelessly tossing things away, filling up landfills. There are usually ways to recycle, repurpose, and share things with others. But, for awhile, until you’re in a decluttered state, I do encourage you to do what it takes to get to a point where: 1. you use what you have, 2. you can fit what you have. It is a freeing and peaceful place to be. And, you can do it!

Holiday Gifting

*Disclosure: Links included in this post are amazon affiliate links. This means that, at no additional cost to you, I will earn a small commission if you click through and make a purchase.

The holidays may look different in 2020. Yet, if you plan to participate in holiday gifting in some way, shape or form, here are 4 great tips. They’ll help you maintain the spirit of giving this year, while staying organized and on top of your gifting game.

1. Dedicate a holding spot for gifts

It’s helpful to designate one spot in your home to stow gifts you’re collecting before you’re ready to give them. That way, you’ll always know where to look and you won’t forget you had something. No more surprise discoveries of gifts in random places when it’s too late!

Before wrapping – like if I buy something very early – I’ll keep it (shhhh! don’t tell the kids) in a bin on the top shelf of my closet. If unwrapped gifts are out in the open, there’s a chance someone could stumble upon them and ruin a well intended surprise.

Word of caution here: just like any other area of your home, this area can be prone to clutter. Purchasing with intentionality – with a recipient and event in mind, helps to guard against an excess accumulation of “just in case” items.

2. Wrap as you go

gift

Maybe it’s your thing to have a massive wrapping party the night before Christmas, and if that works for you, that’s awesome. I’m a fan of wrap as I go so I don’t feel behind. There’s enough to do just prior to a gifting event. I’d rather be ready with the gifts in plenty of time.

And, realistically…if you’re like me, most of your physical gifts are arriving via your favorite mail delivery service. The deliveries are gradual, so it only takes a few minutes at a time to keep up.

3. Keep it simple

One way to simplify your gifting is by following a theme. The current environment can feel isolating, so anything to encourage connection within the family unit is great – ie puzzles, games, a fun cookbook. Here are some theme ideas:

  1. Cozy – pj’s, slippers, hot chocolates or teas
  2. Games – inexpensive and fun for the whole family. These are some we enjoy, perfect for age 6 or 7+:
  3. Homemade – framed art, written pieces, crafts, sewn pieces – the sky is the limit
  4. Experiences – this is always a good one and I’m encouraged with how popular this trend is. Now, it’s a little trickier, but with some imagination, you can find ideas that don’t require travel or can be created and executed in the great outdoors or even within your home.
  5. Food – consumables are great gifts! They can be enjoyed and shared by many, and don’t contribute to the accumulation of stuff in your household.
hot chocolate

4. Use Santa’s Bag app

I blogged about this (and other ways to take stress out of the holidays) last year. Santa’s Bag is a free one stop shop app from the app store. It allows you to identify gift recipients, log gift ideas and purchases, and assign individual & overall budgets. I’m using the app again this year, and I’m even more of a fan now. My 2019 data carried over, and was such a helpful reference for me as I built my 2020 plans.

Advantages: helps with all stages of gifting – before, during, and after/prep for the following year. Also helps to ensure equity across recipients, avoiding the “Oops, I didn’t realize we got Jr. double the gifts that we got Jr.’s sister”.

There’s also additional functionality that I don’t personally use, but could be very helpful, such as incorporating wish lists.

Whatever your gifting looks like this year, it’s the perfect time to take inventory of what’s really important, to embrace how this time might look different, and who knows? Maybe you’ll come up with some great new traditions that you’ll want to repeat year after year.

Happy Holiday Gifting!

Manage Your Schedule So It Doesn’t Manage You

As we, to various degrees, ease back into school schedules, sports, holiday commitments, etc., it’s a great time to get a handle on our schedules and calendars. This topic encompasses broad categories like time management, prioritization, self awareness – all the things. I’m throwing in equal parts philosophical and practical. Let’s dig in.

Tune in to how you spend your time

You might be thinking…what do you mean? I’m doing what I have to do 24/7, to keep little people fed and clothed, and there’s no flexibility or extra time there! I hear you! However, if there’s even a small part of you that is yearning to “find” more time, or manage your schedule differently, the first step is becoming more aware of you spend your time.

All work and no play? All play and somehow no time to work and get things done? No right or wrong, but there should ideally be a relationship – a correlation, between how you spend your day and what you need to do, what your interests are, what you enjoy, what feeds your soul, and what moves you closer to your goals.

Be Ruthless With Your Calendar

You control your calendar. It doesn’t control you! Identify your top 3 priorities. Does the way you spend your days support those priorities? What is sucking your time that you’d rather not do? Do you feel too busy? What if you literally stopped doing X? Yes, people need to be fed, and most of what we do is likely necessary. But, consider doing things less frequently…2 times/week to get groceries currently? Try stretching it to 1. Find 1 thing and stop doing it. See what happens.

calendar

Decide what you can delegate, then do it. You probably don’t need to be the one doing everything that you’re currently doing. Yes, I’m sure you’re the best dishwasher loader in all the land and nobody else does it remotely right. But, sometimes good enough is enough. Are you making lunch for your kids? Have them make their own (age dependent). Consider sharing transportation duties, too.

What do you want to find MORE time to do? Be specific, realistic, and start slow. 1 yoga class per week, 1/2 hour by yourself, grocery store without kids, a date night, a daily walk, a class, organizing, baking, reading, sleeping, sitting by yourself in your car in a parking lot and listening to a podcast and taking a second….(right?!) What resonates with YOU? Don’t wait for the stars to align. Carve out time for what’s important to you. Don’t get overwhelmed thinking you’ll never make it to the finish line. You may not become fluent in French by next week, but multiple sessions of 20 minutes all add up and move you closer toward that goal.

It’s a worthwhile challenge to declutter and manage your schedule, peeling back and reducing or eliminating what is keeping us from achieving our goals or being fulfilled.

Write it down

If you have a thought that you don’t want to lose, what do you do? There’s no right answer, but having AN answer/a SYSTEM is soooo helpful. Write it down! My system? I immediately enter it into my phone’s calendar. I put it where I know I’m checking anyway. And, I assign a time to it when I know I’ll be able to handle it. I often default to 9pm. If I have to register a kid up for an activity, for example, but don’t have time to handle it right away, I’ll add a calendar entry on my phone’s calendar for 9pm to do the registration. So, once the kids are down, I can look through my misc. tasks for the evening and get them checked off.

Or, if I’m out and about and remember that we need milk, I’ll add an entry that says “groceries (milk)” for the following Thursday, because that’s when we get groceries. It will be there when I’m planning my Thursday.

write it down

This little hack is a great tool to guard against forgetting. We ALL forget things. But, the beauty of utilizing tools, technology, or even good old fashioned paper is that THEY are doing the “remembering” for us! Write it down! Then you don’t need to rely on your memory. Because let’s face it, our minds are jumbled with what we need to do, where we need to go, running errands, working, parenting. Let’s let our tools work for us. My system is 1000% more reliable than my memory.

Live in your days, not for the future

It’s easy to fall into a habit of living for some future time. If I only get through X, I’ll make it to the weekend or the vacation. And, THEN, I can relax/have fun/do what I want to do. But, the moments you’re trying to get through to get to the “fun” stuff ARE your life. Yes, there are steps you can take to tweak each day by bringing more of certain activities in, or decluttering certain ones out so that each day can look more like you want it to look.

But, even more than this, adopting a mental outlook that shifts how we view even the most mundane of days is helpful. Load after load of laundry? Shift that to gratitude for having things to wash and loved ones to wear the clothes. Tight deadline at work? Wow – employment and productivity are gifts! Days full of meetings? What great opportunities to have community with others, hear their ideas and share your own. Angst over your schedule can be flipped on its’ head by adopting an outlook inclusive of gratitude, perspective, and, even “this too shall pass”, if you’re in a particularly trying time.

A combination of some practical habits and systems (writing things down, delegating, prioritizing, saying no) along with a healthy dose of grace, goes a long way. Regardless of what is on your calendar, there is good to be discovered each day.

How to Prepare Your Home For Winter’s Chill

*Guest blog written by Paul Denikin of dadknowsdiy.com. Photos courtesy of unsplash.com.

As winter weather fast approaches, there are many things you can do to help protect your home this season. With these few maintenance fixes, you can safeguard your house and give it some much-needed TLC before the temperature drops for good, using these helpful tips. 

Replace Air Filters

Cooler weather and air quality go hand-in-hand. Depending on the type of home that you live in, whether it be permanent, vacation or bi-annual, your filters should be changed accordingly.  Air filters do not carry a definite replacement requirement. However, your living conditions will help gauge when you will need to make the switch, such as any allergies, filter type, and pets. One rule of thumb to follow, however, is to switch your filter out every 2 months just to be on the safe side and to keep the quality of your air continuously clear.

Changing air filters is a cinch and is typically either found in the ceiling of your home or located next to the HVAC unit in your garage or basement. All you’ll need to do is slide out the old one to replace it with a fresh one. If your vent cover is dirty, you’ll need to remove dust, leaves, and cobwebs that could impede air flow. A backpack vacuum cleaner is a great tool for outdoor clean-up projects like this one, as they are more powerful than a regular vacuum and feature enhanced filtration. 

Protect From Drafts

winter window

Drafts do more than just make you feel uncomfortable in your own home—they are an opportunity for heat to escape, raising your energy use, heating bills, and carbon footprint, all in one fell swoop. Take steps to insulate your windows from drafts. All you need are some elementary handyman skills and a handful of basic tools like a caulking gun and tape measure. 

If your windows are in need of some professional TLC due to a damaged sill or seal, you may need to contact a professional for repairs. Most homeowners spend between $170 and $375 to replace a window pane. 

Spruce up Pipes

Depending on where you live, you may have insulated or bare walls and pipes. Homes located in northern states tend to be pre-insulated, due to long winters, while the south’s sporadic cold weather leads to bare piping systems. Frozen pipes are hazardous because they can block water from flowing. Since ice expands, this can lead to bursting. Invest in some insulation which can keep the entirety of your home warm, as well as your pipes. 

When pipes burst, this can also cause potential leakage among your walls, which can transform into mold if not remedied properly. If your pipe is still salvageable, you may tighten them or use epoxy or rubber to seal the cracks. However, you’ll need to replace any exposed areas or your entire pipes if they are too damaged to avoid costly repairs in the long run. Due to the flooding that typically occurs along with burst pipes, repairs often run $5,000 and up.

winter home

Check Smoke & Carbon Monoxide Detectors

Accidents are inevitable, but the leading causes of home fires are always preventable, according to Accurate Home Inspections. One of the best ways to protect yourself against a potential fire is to obtain a smoke alarm and carbon monoxide alarm. Smoke alarms are inexpensive ways to protect yourself from harm. Though you can usually smell smoke, you cannot always see it. When there is smoke or a fire in a home, smoke alarms are typically loud enough for you to hear them, even in your sleep. Most homes should have more than one smoke and carbon monoxide detector, especially in each sleeping area. 

Midamerican Energy Company explains carbon monoxide is generated by fuel-burning devices and appliances when fuel doesn’t burn completely. Like a smoke detector, a carbon monoxide detector has an alarm, however, there are three main sensors and once it goes off, it must be placed in a carbon monoxide-free zone in order to reset. 

When it comes to the quality of your home, the little things go a long way. Get your house cold-weather ready by tightening the loose ends on maintenance and creating a harmonious environment for the seasons to come. Visit Making Space Organization for more tips and information on how to keep your home organized, and remember you can schedule a complimentary consultation to get clutter under control!

How to Organize Kids’ Clothing

There’s nothing cuter than a sweet little babe in a tiny outfit! I’m here for the fun colors, beautiful classics, tiny shoes, and trendy pieces that only a baby could get away with. It’s tempting to think we need all the things – at least with a first child. Then, if siblings come along, we tend to get a little more practical. Still, the desire to hang on to things, coupled with how fast little ones outgrow pieces, contributes to kids’ clothing being a pain point in a lot of people’s homes. Here are some tips for how you can organize kids’ clothing!

Pare Down

Wait, didn’t I just write about how I’m here for it all – the tiny Nikes, the hair bows, and everything in between? Yes, but we live and learn. Let your available space be your parameter for how much to have. Even if you have a large closet and dresser, you do not need to fill it! It’s helpful to keep some space for extra diapers, blankets, and linens – or even just to leave empty.

Babies and toddlers outgrow their clothes in the blink of an eye!! You need less than you think. And just because you’re offered free or discounted clothes does not mean you need to accept them! You can appreciate the gesture and politely decline. Or, choose a small selection of what you really need or love, and the rest can go on to bless someone else.

kids closet

If you’ve already accumulated a lot and are drowning in stuff, don’t despair. It’s never too late! You’re just due for a good edit. Remove anything that’s stained or in bad shape, and be realistic about how much you need to keep for the possibility of future children.

Having less makes sense because it means you know what you have, the clothing will actually be worn, it will fit in your available space, AND you’ll save money! It’s also a great foundation for handling ongoing maintenance – more on this below. In short, it will make your life EASIER!

Use Systems – Too Big/Too Small Bins

Kids’ clothes is not one of those “set it and forget it” categories of organization. It’s dynamic, as little ones are constantly outgrowing things. Larger sizes move in and smaller sizes move out. Having a system is KEY! I love the too big/too small bin system. I wrote about it in a post titled Organizing for Baby

Here it is, in a nutshell….keep one bin in your child’s bedroom containing clothes that are one size bigger than what they’re currently wearing. Do NOT mix sizes in one container. Bigger sizes can be stored away in a labeled bin in the garage or basement storage area. Also keep one bin of too small clothing in your child’s bedroom. That way, it’s convenient, so when something is outgrown, it can go directly into the labeled bin – or directly to be donated or sold. When it’s full, it moves to a storage area.

It’s convenient so things can be handled right away! To prevent overwhelm, you’re only keeping 2 organized bins at arm’s reach, with everything else stowed away, in bins labeled by size and gender.

Stay One Step Ahead

It’s helpful to realize that Junior needs new snow pants before you’re packing up to go sledding. I recommend going through the too big bin to see what you already have and assess what is needed for the upcoming season. Then, you can shop strategically to fill in gaps of what you need (not accumulating just because something is free, on sale, or just cute).

Donate and Sell

donate clothes

Good news here! There are lots of people just like you who are having babies and needing all the clothes and gear, and subsequently outgrowing it. This contributes to consignment and donation opportunities galore!

Goodwill is my go-to for donations, but there are many great options. As far as consignment, you could use Facebook marketplace, check with other parents to see what they use, and explore local consignment stores. You can save a lot of money this way, still finding cute quality items, and rest assured that you’re repurposing good clothing.

Make Maintenance a Habit

It’s easy to fall behind and feel like we’re in perpetual catch-up mode. Going through clothes seems to always be on the to-do list! While you may need some longer up front sessions to pare down and establish systems, the goal is to get to maintenance mode. Let’s create some habits! So, yes, in one sense, a habit IS always on the list because it’s something that we do repeatedly. Though, unlike a cleaning chore such as dusting, which you might do every Tuesday, make going through clothes a habit based off identifying and reacting to triggers. For example:

  • Trigger 1: Child outgrows an item of clothing.
    • Response: Decide what to do with it and follow through! 1. Donate, 2. Sell, or 3. Move the item to the too small bin. It’s that bin that’s already in their room – just waiting to be filled with too small clothes, right? Do it right away!
  • Trigger 2: Child outgrows everything in their current size.
    • Response: Move everything in that size into the too small bin (or donate or sell ) AND move items from the too big bin (next size up) into the dresser.
  • Trigger 3: A change in season
    • Response: Go through the too big bin to assess upcoming needs.

You get the idea. When you’re aware of these triggers and respond with the predetermined response, it’s not a big job. It’s just continual – for awhile. Once your kids reach age 4 or 5, I found that they’re not outgrowing things as quickly, and the job becomes much more manageable. Hang in there!

Organizing the Hard to Organize

*Disclosure: Links included in this post are amazon affiliate links. This means that, at no additional cost to you, I will earn a small commission if you click through and make a purchase.

Certain items and spaces lend themselves well to being organized. And, others are notoriously challenging. The truth is, any area can get and stay organized, but organizing shouldn’t take lots of time or be too fussy. Here are my recommendations on how to organize the hard to organize…

1. Fitted Sheets

I just cannot with fitted sheets. Solution to maintain neat and tidy? Contain sheets in a bin! Just do your best to do a quick fold or roll (nothing fancy), put them in a labeled bin, and move on with your day. Let good enough be enough. You’ll know where to find the sheets, and they will not look like an eyesore because they’re not even visible!

2. Swimsuits

Folding swimsuits into itty bitty units seems more trouble than it’s worth. Again, container to the rescue! All my swimsuits live in a bin on my closet shelf. I know where to find them, and they’re all contained. It works! And, a system that works is a good system.

3. Pantry Staples

Individual bags and packages of food loose on a shelf is a recipe (ha ha) for looking organized at a point in time, then getting messy as soon as the next grocery load arrives. I recommend 1 or a combination of the following: 1. Transfer food into a food storage container like an OXO, discarding the original packaging. OR 2. Contain boxes and bags of a certain category together in a large labeled basket or bin (snacks together, breakfast items together, etc).

4. Food Storage Containers

Find matches, discard the rest. Use drawer dividers like the below photo, or store with lids on. Why? Yes, you can fit fewer in a drawer, which I actually don’t mind, as it forces me to pare down. But, it solves the single biggest issue with food storage containers, which is not having bottoms and lids that match and/or not easily locating the pairs.

organized kitchen drawer

5. Shoes

Shoes, shoes everywhere! With a multi person household in a 4 season climate, you’ve got rain boots, snow boots, sandals, athletic shoes, water shoes and everything in between!

Storing shoes in a combination of places works well. As much as I’d like all the shoes to live in bedroom closets, it’s just more convenient to have a few of the most often worn pairs near the front door or in or near the garage.

Bedroom closets work great with shoe shelves and for containing the pairs not worn as often. By the doors, I prefer shoe shelves or baskets. The key is putting a limit on it. I give my kids 3 pairs each to be by the door, which is plenty. Why 3? It’s what we have space for, and it’s sufficient. It’s a daily process to run the extras upstairs (anything above and beyond 3), but it prevents the area by the garage from getting overcrowded.

6. Messy Drawers

Step 1: Purge. Step 2: Install drawer dividers or drawer organizers so that everything has a place in the space. The end. No need to overcomplicate it.

7. Any Other Spaces

There’s a repeatable formula that works no matter the space….pare down until you’re left with an amount that fits within your space, group like items together, contain, label. It sounds simple because it is! Simple doesn’t always mean easy. And, yes, you have to put in the work. But, there’s no need to overthink it. And sometimes, good enough is just right. When your space is edited down, the items are contained, you’re good to get on with the rest of your life.

Organizing Home Improvement Projects

What did people do during quarantine? It’s likely that some home improvement projects got checked off the list. How do we approach these projects in a way that doesn’t break the bank or stress us out? Is there a method to the madness?

The principles of organization can absolutely apply to planning out and executing a home improvement project! Whether you’re going the DIY route or bringing in the pros, here are some tips to make the process and experience a smooth one.

1. Make a project list

project list

From the time we moved into our home over 7 years ago, I’ve had a home improvement list. It has evolved over the years, as new priorities come up, and others get checked off. But, it has been a very helpful tool to identify priorities, save, and plan for what’s next. And, keeping a record of updates that were made, when, and how much they cost is helpful if you ever wanted to list your home.

The list is simply a spreadsheet containing projects that each have an assigned priority of 1, 2, or 3, along with an estimated cost. Subscribe at the bottom of this post to receive a project prioritization template!

2. Prioritize your projects

Why is this necessary? Well, it’s helpful because of the pull between time and money. If you have the money, you still can do only so many things at once. And, if you have the time, but not the money for everything, you can focus on making deliberate progress towards accomplishing something from your list.

Be realistic about how much you can do at once. Try to evenly spread out priorities so everything doesn’t get a priority 1.

3. Do some research

Luckily, there’s youtube! And, lots of other online resources to equip you with the knowledge you need for those DIY projects. It’s also great to get a referral from someone you know and trust, so ask around.

Look for reviews, and prioritize quality. If a price seems too good to be true, the quality might not be there. And, if you need supplies or plan to hire some or all of the work out, here are some questions you could ask.

  1. What is the leadtime on X product?
  2. Do you carry X in stock or is it special order?
  3. What is your availability?
  4. Do you offer free estimates?

4. Make a supply list

List everything you need. But, don’t go to the store yet! Check to see what you have, so you don’t rebuy a 4th tube of caulk.

5. Estimate costs

Once you’ve completed your research step and have selected the materials and/or professional you’ll be using, add up all your projected costs. Be thorough! If you need to purchase 12 foot long boards that don’t fit in your car, include the cost of delivery, or renting a truck.

6. Estimate timing

There’s two different components to this. One is how long it takes to actually do the job (how much work is entailed). The other is where you apply some realism, knowing you’re fitting the job into real life. I recommend doubling your initial estimate!

You can also go down your entire list, putting ballpark timing to everything on the list, by quarter, season, or month. Then, as you finish a job, you can tackle the next thing on the list, and fine tune your timing for that project, per above.

7. Finish what you start

home improvement

Doing this is the single biggest way to stay organized in the midst of projects. We have a tendency to get inspired, have grand plans, get started, then get distracted, or move onto something else when we get tired. We leave a wake of tools and other clutter in our rear view mirror. I recommend tackling something small enough that you can and will finish what you start. Then, move on to the next thing. Having no more than 1 in-process project at a time is a good rule of thumb.

8. Reconcile your list

When a project is completed, I like to go back to my list, and update costs to replace estimates with actuals. Over time, you’ll get better and better at estimating.

It’s amazing the home improvement projects people can tackle. No need to be intimidated – with so many resources at our fingertips, and a little planning, you can do it, too!

How I Cut My Wardrobe in Half

In HALF? Drastic, huh? I sincerely believe that most of us could easily and happily live with half of what we currently own – across all categories, not just clothes. But, we’ll focus on clothes here. Let’s dig into what approach I took, and why anyone would want to do this in the first place.

I did NOT set out to cut my wardrobe in half! It’s just where I naturally landed because that’s what worked for me. My end game wasn’t to check a box or pat myself on the back for arbitrarily choosing a goal and achieving it. It was the long game of deliberately building, cultivating, and maintaining a wardrobe that was a good fit for me. One that focused on quality over quantity, pieces I like to wear, that meet my needs and fit my lifestyle.

flatlay wardrobe

WHY I reduced my wardrobe

It’s helpful to find YOUR why….It may be that you’re exploding out of your space. It may be because you don’t fit in many of your clothes and just need to release the “weight” of the clothes that no longer work for you. Finding your why helps to keep you motivated. This was mine:

1.I had a lot I didn’t wear

Having lots of pieces I didn’t wear, or didn’t wear very often, felt like a waste of space to me. I was disciplined about regular clothing purges, but I like to be intentional with what I own, and I’d rather have fewer pieces that are worn more often.

2. It was hard to pull outfits together

I would try to manage this by selecting my clothes the night before, but I had lots of disparate separates. I wasn’t intentional with noticing a wardrobe gap and filling it, but would instead purchase what caught my eye. I knew I could do better.

HOW to reduce a wardrobe

1. Edit gradually

Wardrobe editing does not need to happen overnight! The process took me well over a year, and, in reality, there’s no real end point. It’s a continual watchfulness to keep an eye on what I have, what’s coming in, and what I’m ready to part with.

I often do a pass through my closet, editing down all that I think I can. Then, I go back another day and easily find more. There are layers to the editing process, and a gradual approach allows you to get to those deeper layers, as you realize the previous edits have not left you lacking, but motivated.

shirts on hangers

2. Start with low hanging fruit

Find what’s broken, stained, looks worn, or doesn’t fit, and get them out!

3. Intentionally ADD pieces

I didn’t just purge, but added choice pieces as well. I still do. This may sound counterintuitive, but the point wasn’t to just have fewer things, it was also to have workhorse pieces that mix and match well, and will stand the test of time – both from a quality and a style perspective. Sometimes, this involves thoughtful additions.

It also gives those of us who enjoy clothes room for trying trends here and there, and bringing some pieces in. And, you know yourself best. If you think this would be a slippery slope for you, don’t go here! But, for me, it has worked fine – as long as I release items if something new comes in.

clothes

4. Remove temptation

What are those hot buttons for you? Fashion influencers, who, in fact…”influence” you? To buy the thing you don’t need or even really want? Well, unfollow them! Or, limit your exposure.

If it’s trips to the mall, limit that, too. You can still have a treat now and again. But, think about your goals. If your goal includes a smaller wardrobe, or freeing up money for other things, think twice before you fall into an old habit that may not support the achievement of your goal.

5. Consider seasons

If you’re purging in the summer, and you’ve been wearing exclusively shorts and tanks for the last couple of months, don’t get rid of all your pants! Again, go gradually, and let yourself get into the next season to see what you wear. On the flip side, transitioning out of summer season would be a great time to look back and edit out your summer items that you didn’t wear all season. If you didn’t wear it this summer, you probably won’t next summer.

It will become a habit to periodically check in with your closet, and continually revisit what gets worn and what doesn’t.

6. Give yourself a timeline

Anything that has not been worn in a year or more can be a contender for going bye-bye. You’ve been through all the seasons, and unless there’s a really compelling reason to keep something (for sentimental reasons or a special event coming up that warrants keeping that cocktail dress), ask yourself why you would keep it, and what else you could do with that space or the money you could get from selling the item.

7. Set small goals

If I originally set out to cut my wardrobe in half, it wouldn’t have happened. But, setting and achieving small goals on a daily basis is easier to swallow. I often target the number 5. Find 5 things today that you no longer need. Achieving small goals works. It matters. Just like starting the day by making the bed. It gives you a small sense of accomplishment and productivity for the day that builds.

8. Begin with the end in mind

As you embark on this journey, it’s helpful and motivating to keep your end goal in mind – whether it’s financial motivation, peace of mind, or freeing up space. Keep going, a piece at a time, day after day. Getting rid of 20 pieces is great. 5 pieces is great. Any number is great.

If you’re motivated by rewards, think of how you’ll treat yourself WHEN (not if) you achieve your goal. The treat doesn’t need to cost money, but it could. I recommend being deliberate about what you do with anything you make from selling items. You could start a trip fund, a holiday fund, or whatever helps to keep you moving forward. It’s all about progress!

20 Organizing Projects That Only Take 20 Minutes

Organizing does not need to take all day. That sounds overwhelming, doesn’t it? Organizing can be tackled in small increments of time. Even 20 minutes is enough to make major progress! 20 minutes here leads to another 20 minutes there, and before you know it, you’ve made significant headway! Here are 20 organizing projects that can be done in no more than 20 minutes!

TO ORGANIZE: TIPS AND TRICKS:
1. Edit down water bottlesKeep only the number you need
2. Food. Storage. Containers.Try storing with lids on!
3. Go through mail pilesMake sure papers have a “home”.
4. Edit down magazinesTear out key articles. Discard rest.
5. Discard expired spicesFriendly competition to find the oldest!
6. Find matches for socksDiscard/repurpose strays (sock puppets?)
7. Tackle a junk drawerHint: Contain loose items in bins.
8. Empty trash from carMake this a habit each time you get out.
9. Organize bedside tableBe minimal here…book, notepad, pen, etc.
10. Go through towelsWorn towels can become cleaning rags
11. Organize jewelryUntangle necklaces, donate unworn pieces
12. Discard old makeupIf you have lots, start with 1 category
13. Go through kid’s dresserFind what no longer fits and donate/sell
14. Edit one book categoryFocus on kid or adult & set a donation goal
15. Clean under kitchen sinkAny unused or old cleaners? Extra rags?
16. Edit writing utensilsDiscard markers or pens that don’t work.
17. Make a grocery listHelps to keep the food budget in check!
18. Review upcoming weekWhat’s unusual/busy day/transpo needs?
19. Catch up on emailsSet a 15 min. timer. Get thru what you can!
20. Go thru hair productsGather stray rubber bands, bobby pins, etc

I’m sure you could come up with a list of 20 more small organizing projects to do. And, your list may not match this one. That’s ok! You know what the hot spots are in your home/life. Maybe you could use a 20 minute block on organizing schedules and time management. Or, perhaps it’s a troublesome physical space like a countertop. Whatever it is, never discount the power of a focused 5 minutes, a focused single moment. Organization is within reach!

Top 5 Master Closet Tips to Implement Today

*Disclosure: Links included in this post are amazon affiliate links. This means that, at no additional cost to you, I will earn a small commission if you click through and make a purchase.

What’s the state of your master closet? Overflowing? Hard to find what you’re looking for? Perhaps you’re a bit unsure what’s lurking in there? Or, maybe you’re in pretty good shape, but just looking to make some minor tweaks. Either way, we’ve got you covered. Here are 5 master closet tips to improve the state of your closet today.

Why today? Because these things don’t involve construction, purchases, or hours of work. These are quick fixes that will make a big impact. If you only have a few minutes, just check off a few of these items, then move on to the rest another time.

1. Remove anything broken

Let’s intentionally start with this low hanging fruit. I use the term broken loosely, so you likely have more than you think in this category. Belt leather cracked? White shirts looking dingy? Cap on your high heels worn through? Those white shirts may have been your favorites, but they don’t last forever. It’s ok to move them along. You’ll allow the remaining clothes more breathing room, and open space for new favorites to emerge.

2. Purge

Set a goal. Make it lofty. Hit your goal, then set a new one. Get rid of 20 things. 40 things. I find it helpful to do this in a couple sittings. You can do a first pass through and you may think you’ve found all that you can, but then you’ll come back the next day and that momentum will build. You’ll find that you can dig deeper. Let questions such as this guide you…Does it fit? Do I wear it? Do I like it? Would I buy it again?

3. Get matching hangers

If you did nothing else but this, you will 100% be making a noticeable difference. This consistency is visually calming, and a good hanger is beneficial to the life of your clothes, too. Out with the wire hangers!

4. Contain loose items

Loose items tend to look cluttered. Try containing scarves or belts in a cute basket or a drawer. Look for commonalities between your items, so they can be grouped and contained together. Some common categories that may be in a master include: towels, sheets, accessories, hats, belts, or swimwear. Question whether other random one-off things that you encounter belong in your master closet, or whether they would be better off in another area of your home.

5. Be intentional

If you have a large master closet and want to keep other household categories such as linens, off-season clothing, files, etc. in there, great! Just be intentional so that the space doesn’t become a catch-all of miscellany.

I hope these master closet tips are helpful for you. As always, the point is not to create a space of perfection, nor should the purging make you feel deprived. On the contrary, when the number of items being stored fits nicely within the space you have, it will bring a sense of calm to your environment. And, I bet you won’t miss those dingy white shirts.

Garage Organization

*Disclosure: Links included in this post are amazon affiliate links. This means that, at no additional cost to you, I will earn a small commission if you click through and make a purchase.

Garages can fall to the bottom of the list as far as organizing priorities. Because, let’s face it – organizing garages can be dirty, hot, unglamorous work. But, the reward is worth it! It would be great to be able to park a vehicle in the garage, eh…? Organizing your garage is a really helpful thing to get done before cold weather hits, too. Here are some ideas on how to get that garage in tip top shape.

1. Take everything out.

The process of organizing a garage is no different than it is for any other area of the home. Taking everything out is the first step. It lets you see what you have and allows you to entertain some fresh thinking about the space you have and what belongs where. During this step, the state of the garage will get worse before it gets better, but hang in there. There will soon be order to all those piles.

tools

2. Declutter.

Garages are notorious for being the catch-all dumping ground. If you don’t want something inside, but aren’t ready to decide where it belongs or if you need/want it, where does it go? The garage! So, spend some good time here getting rid of what you no longer need. If your kids are too old for ride on toys, you can donate them! Broken hose nozzles, unused lumber, tires, outgrown sports equipment, flower pots, and duplicate tools can all be sold, donated or tossed.

3. Create zones.

Like goes with like. What are the categories of like items that you’d like to store in your garage? Some common ones include yard, pest control, auto, and sports equipment.

Here’s an example of a cabinet that contains zones for auto, yard, pests, general cleaning, and misc. (Labels were later added). Containers would be another option for keeping these categories separated.

cabinet organization in garage

4. Use track systems.

We did this a couple years ago and I wish we did it sooner! We have two tracks in a row that accommodate two baskets. It’s enough for all the basketballs, volleyballs, and other random sports equipment. It’s hung low enough that everyone can reach it, which is perfect for enabling everyone in the family to participate in keeping the space picked up and maintained.

5. Get things off the floor.

Luckily, garages often have ample wall space to hang racks such as the below. They’re perfect for getting things like rakes and shovels off the floor. Lowe’s, Home Depot and Amazon are all good resources for finding hanging units. Many systems are quite flexible and can even accommodate things like chair and strollers.

Another staple garage item is a sturdy clear Rubbermaid (or similar) tote with lid in a large 56 or 66 qt. size. You can pick these up at Meijer or Target. Make sure you use the lid to allow stacking of bins and keep things dust free.

Sturdy shelving is another great basic that helps to get thigns off the floor. There are plenty of options. Here’s one from Amazon.

Homeschool Setup

Ah, home school, distance learning, whatever the phrase may be – many of us never thought we’d be in the position of homeschooling, but here we are! So, let’s put some thought into what can make this the most successful for everyone.

Most of us are not teachers and don’t have education degrees, but we do know our kids. So, let’s set up an environment that makes the most of what this year will bring. Our kids need less than we might think. A dedicated room is not necessary! After all, the classroom environment is often one room for 20+ kids. We got this! Here are some ideas for homeschool setup that I hope you’ll find practical to implement. Happy schooling!

1. Think in terms of zones.

reading zone

If we consider how a classroom is often set up, there are zones. Age dependent, maybe there’s a reading area, dress up corner, a craft zone, workspaces, and a drop zone (for backpacks, etc). I’m not suggesting you carve out space for all of these, but home setup can mimic key pieces of this environment.

Designating a workspace with a writing surface is among the most important of these. Separate the sleeping area from the workspace. I’ve found that a workspace other than my kiddos’ bed helps them to mentally transition to their day and prepare to learn.

A cozy reading nook could be as simple as putting some pillows, a container of books, and some little fairy lights in the corner of their room, but could be seen as a magical fort to your child.

2. Have supplies at hand.

Not only the right supplies, but within reach of your child, contained, labeled, and in a place where they know to find them. Let those back to school supply lists guide you, so you can make sure to have the basics on hand.

Consider lined, plain white, and construction paper, as well as pencils, colored pencils, pens, markers, a calculator, scissors, glue, and some folders.

These caddies are great for having the most often used items at your fingertips, and have the added bonus of portability. Art class in the backyard? Grab the caddy and you’re good to go!

3. Make it fun!

One of the benefits of learning from home is that you can be creative and flexible, taking full advantage of the environment. Learning doesn’t all have to take place with a chair and desk. Mix it up and use a beanbag or flashlights, take a lesson out on your deck or have reading time in a hammock. You know what will work for your child – what will be a fun new adventure vs. what might be distracting. And, if something doesn’t work, that’s ok! Experiment and learn.

4. Maintain the space.

Having a home for all the supplies is one thing. Maintaining the space is another. Just like your kids are responsible for doing their part to maintain order in their classroom, they can be responsible for putting things away at the end of their homeschool day as well.

5. Independence is key!

supplies

This one applies to kids of all ages. Yes, it’s helpful to have supplies within reach for the youngest of students. But, it’s also important to ensure older students understand that you’re there to support them, but just like in school, they’re expected to be independent learners.

Regardless of your homeschool setup, everyone will be just fine. And, we may all learn a thing or two about patience, flexibility and resilience in the process.

Kitchen Organization

*Disclosure: Links included in this post are amazon affiliate links. This means that, at no additional cost to you, I will earn a small commission if you click through and make a purchase.

If there’s one room in the house worth organizing, it’s definitely the kitchen. It’ll make you feel like you’re on top of the world. It’s the hangout place, the space you’re in morning, noon, and night. It can feel frazzled and chaotic or calm and chill. Here are some tips to get your kitchen organized.

1. Clean the kitchen before bed.

Do the dishes, putz around and pick up. Get it into some semblance of order before heading to bed for the night. Yep, you’re tired from your day, but your morning will thank you.

2. Pare down dishes.

Somehow, we accumulate dishes – mismatched plates and miscellaneous bowls. We may use them because they’re just, well, there. But, we could easily get by on fewer. Determine how many sets of dishes you really need, and go through your current inventory inspecting for pieces that have seen better days – that have been melted in the dishwasher, or are cracked. You get the drift. Anything that is excess, damaged, or no longer fits your lifestyle can go.

3. Corral water bottles.

Talk about accumulation! Water bottles build up from your kids’ sports, the freebies you get at events, or through work. The allure of “free” isn’t always in your favor – like if you don’t have room for the item. Step 1: Pare down to your favorites, or one for each family member. Step 2: Ensure they each have a home. I love the above water bottle holder to keep them neat and tidy.

4. Try drawer dividers.

$20 well spent. They’re great for dresser drawers, bathrooms, and most certainly kitchens. They help to organize messy utensil drawers, food storage container drawers, and anything in between. Bamboo dividers like these are particularly pretty in a kitchen space:

5. Tackle counter clutter.

Pay attention to your pain points here. Is it paper accumulation? Misc. items on the counter? I recommend tucking appliances away. Even a toaster that may be used once/day can have a home in a cupboard as it takes but a minute to get out. If you have items that you like to keep on the counter (a place for keys or change or maybe a diffuser and oils) consider a pretty tray, so at least the items are contained instead of loose on the counter. Here are some decor options:

6. Embrace the junk drawer.

Say what? Did I write that? Sure! We all have miscellaneous things that can be grouped together in a drawer. But, grouped is a key word. See what the similar items are – rubber bands, notepads, pens, keys, etc. Clear acrylic drawer organizers are great for separating out piles so the drawer doesn’t become a jumbled mess.

7. Sort through food storage containers.

This is typically one of the top kitchen pain points. I’m “team lids on” for storing, so you’ll never be searching for lids. But, if you have another storage method that works, go for it! Either way, take some time to pull all the pieces out and make sure everything has a mate – all the bottoms have lids that are supposed to. Discard the rest. Drawer dividers come in particularly handy here if you’re storing containers with lids separate. You can nest the bottoms in each other, install a drawer dividers, and put all the lids on the other side of the drawer.

organized kitchen drawer

8. Organize one drawer or cupboard per day.

How do you eat an elephant? One bite at a time! Kitchens are no different! Kitchens can feel overwhelming, as there are so many items in so many different cupboards, drawers, spaces. Yet, it’s a simple area to break into chunks because it’s a naturally compartmentalized space. Drawers already exist to help us delineate and contain. So, go with it, and tackle one at a time. Junk drawer one day, utensil drawer another. Before you know it, you’ll have worked your way through the entire space.

9. Develop a paper system.

Counters and horizontal surfaces such as tables are clutter magnets. This includes piles of paper. But, you are the one in control of your paper. You tell it where to go! Bills go here, things to file go here, and recycling goes directly into the recycle bin as it enters your home.

10. Pare down pots and pans.

This is another category where you may have more than you use or need. And, since pots take up so much space, it’s really worth your while to pare down. You’re the one who knows what your favorites are, so based on your cooking preferences and lifestyle, keep what you use and get rid of what you don’t! And, enjoy your organized kitchen!

Dipping a Toe into Minimalism

Full on minimalism may seem unattainable. Or, frankly, not even that appealing – at least when we think of going “all in”. But, there’s an opportunity to reframe minimalism by thinking in terms of adopting what does seem appealing, achievable, or fiscally and socially responsible.

There is a significant space to occupy that is centered between all and nothing. And it can reflect the aspects that resonate the most with YOU. Below are some ideas of how you might dip a toe into minimalism. Perhaps you already do some of these things. It’s simply a thought starter…not a checklist or a mandate. Here are 7 ways to explore minimalism:

1.Recycle

Creating less waste is certainly a component of minimalism – and one that isn’t difficult once it becomes a habit. Keep it simple by putting a container for recyclables in a convenient location, and encourage your family/kiddos to participate.

2. Have a spending freeze

This is actually a fun challenge. You can be as stringent or lax as makes sense to you. You could go for a week or a month. Or, you could designate a category or two to be excluded from the freeze. Groceries would be a common one. But, remember, this is an opportunity to stretch. So, even for the excluded categories, challenge yourself to cut back. You’ll likely be surprised by how resourceful you can be.

3. Find 5 things to get rid of

I do this periodically, and find that it’s a good practice to guard against the accumulation of excess. Anything counts. Just 5 things that were in your home that no longer will be. Trash, clothing, donations, things to sell. Identify the 5 and then act on them (ie make that drive to your favorite local donation center). On a roll? Go for 10 items! Or, 20! You’ll be surprised at how easy it is.

4. Try a capsule wardrobe

Capsule wardrobes are intriguing, but can be intimidating. They just seem so….extreme. Truth is, I didn’t know what else to title this. “Wear fewer items of clothing” just didn’t, um, sound right. Ha! At any rate, the objective here is to find those favorite versatile pieces (pick a number) that meet your needs. Choose pieces that make you feel like a million bucks and can be layered, mixed and matched and that you’ll get a lot of mileage out of.

minimalism

Wear them for a month or a season. Some people include accessories, shoes, etc. in their item count and others don’t. It’s not about rules or deprivation, but it is about finding that sweet spot, and challenging yourself to wear what you have and be satisfied with it.

5. Identify your priorities

My favorite minimalism guru Joshua Becker defines minimalism, in part, as the “promotion of things we most value”. How do we promote what we most value if we haven’t first identified those things that we most value? We often think of minimalism in terms such as decrease/strip down/lessen/minimize, but can’t forget to address the flip slide. By doing this reducing, in turn, what are we building up? Priorities, values, time, etc. We don’t truly realize the benefits of minimizing until we acknowledge this piece.

Going through the process of identifying priorities helps you find your why for taking these baby steps toward minimalism. If one of your priorities is travel, for example, then spending less in other areas will feel purposeful, You’re working toward a goal of re-allocating your spend in a direction that has meaning to you.

6. Eat more simply

We all appreciate choices, but consider the benefits of having fewer types of food on hand. Fewer choices likely correlates to a lower grocery bill, less overwhelm of what to cook, what to store, and what to consume. You’ll also likely find yourself eating more real/whole foods – as these are the ones that can stretch, are filling, and have the versatility to make different meals.

7. Start a toy rotation

minimize toys

Box up half your toys. Or, whatever fits in 2 or 3 containers. Just give it a try. Put them aside for a month and see what your kids ask for or miss. My guess is that they’ll really notice what remains. They may engage in deeper play for longer periods of time because they’re able to focus on what’s there instead of being overwhelmed by choices. Then, when the month is up, you can either choose what to get rid of, or bring things back into rotation and remove some others for a month. Just with all of these suggestions, there’s a scalability to this that can be adjusted to whatever level you’re ready for – dipping a toe, or maybe even a whole foot!

6 Ways to Organize Small Spaces

*Disclosure: Links included in this post are amazon affiliate links. This means that, at no additional cost to you, I will earn a small commission if you click through and make a purchase.

It may appear that beautifully organized spaces are always spacious….vast walk in pantries, entire rooms dedicated to crafts or toys. And, this can certainly be the case. However, it’s very possible to organize small spaces. The challenge posed just encourages a little more creativity. Here are 6 ways to organize small spaces.

1. Purge

I had to include this first because it’s more important than ever to start with a purge when you have a small space. Once you’ve edited down to only what you use/like/need should you start the organizing process.

2. Think vertical

There are some really great over the door options on the market. Elfa makes some affordable, quality, configurable over the door units to house anything from wrapping paper and office supplies to clothing. Check them out here https://www.containerstore.com/elfa/index.htm.

You can also find pocketed plastic over the door units great for separating out different craft supplies.

3. Use wall space

There are lots of ways to utilize those open bare walls. Hang a shelf to gain additional storage space for anything from dishes to clothing. Or, if you need more floor space, consider installing a Murphy bed that folds up into the wall when not in use.

4. Utilize under the bed storage

Not a fan of clutter under the bed, but I love the idea of utilizing storage bags made specifically to stow under beds. They’re great for housing bulkier seldom used items such as blankets, comforters, or sweaters. Here’s a good option:

5. Find multi purpose solutions

Consider how to get the most bang for your buck with your furniture and organizational items. Think sleeper sofa or a room divider screen with build in shelves.

Things in this category can get gimmicky, though (would I really use a combination can opener/screwdriver/battery charger?) so I recommend first identifying the purposes you’re trying to solve for, THEN look for a solution.

6. Optimize odd shaped spaces

Kitchens and closet designs are notorious for including odd shaped corners and other spaces that are hard to access and organize. These wedge shaped acrylics are made specifically to fit within lazy susans.

This lazy susan is great for pantry/cupboard corners. Keep round items on the round lazy susan to maximize space. Oils, vinegars, and other jars and condiments fit particularly well on these.

And, the below stacking version is helpful for bathroom products. More often than not, if you have an odd shaped area, others do, too. Google your design challenge and you’ll likely find a host of ideas and products to meet your precise needs.

11 Declutter Questions to Ask

Decluttering is often the first step before organizing can take place. If you have excess, duplicates, broken things, or things you don’t really use or like then there’s no use organizing them! To aid your decluttering journey, here are 11 decluttering questions to ask yourself to help determine what stays and what goes.

1. Have I used it in the last year?

I like a 1 year duration on this question because you’ll make it through each season and multiple events (summer wedding, winter ski season, etc). If you haven’t used something in a full year, consider getting rid of it.

2. Is it sentimental?

decluttering sentimental items

This is a tough category, and know that you can keep sentimental things that hold great importance to you. Noone can tell you otherwise. However, it’s also helpful to remember that the joy is in the memory, not the actual thing itself. So, it’s also ok (and freeing) to let go of things in this category as well. Check out my blog about sentimental items here.

3. Would I purchase it again?

Sometimes we keep things just because. Because at one time we liked it. Because at one time we used it. Because we’re used to it and just don’t question it. But, when you ask yourself if you’d actually spend money on purchasing it again, you’ll hone in on the value (or lack thereof) that the item holds for you.

4. Is it a duplicate?

Only when we pull everything out of a space and observe what we have do we realize what we have. It’s common to discover duplicates of things like tools, scissors, craft supplies, and cords. Determine how many you need of a particular item. Yes, duplicates can be handy sometimes (ie a phone charger in a bedroom and in the kitchen for example). But, more often than not, multiples of things stored in different places throughout the home makes it harder instead of easier to find things.

duplicate items means declutter it

5. Does it have a home?

Where is the one place this item belongs? If it’s something that you want to keep, then find it a home. This makes it easier for you to find what you’re looking for and prevent re-purchasing things you didn’t realize you already own.

6. How do I feel when I see it?

Go with your gut on this one. If something puts a smile on your face, is useful and treasured, it’s probably in contention to be a keeper. If, on the other hand, you feel neutral, or even heavy or sad, you’ll likely feel that weight released if you part with it.

7. Was it a gift?

We tend to hold onto things more fiercely if they were gifts. We don’t want to hurt anyone’s feelings. But, the person who gifted it wanted to make you happy. They wouldn’t truly want you to hang onto something that no longer serves you. It is possible to be truly grateful for something, the thought behind it, the person who gifted it, and still let it go.

decluttering gifts

8. Do I have room for it?

This is key! I’m a huge proponent of letting your available space be your parameters for how much to keep. Having too much stuff for your space makes it hard to see what you have, hard to stay organized, and contributes to an overall sense of overwhelm and clutter.

There’s a way to reframe this to be positive, too. Instead of lamenting that you need to get rid of one of your 4 (fill in the blanks), you can look at the same scenario in a glass half full way by saying “This container looks like it can accommodate 3 of my 4 (fill in the blanks). That should be enough!”

9. Was it expensive?

This is a question similar to “Was it a gift?” There’s a strong pull to keep items that we or someone else paid good money for. And, in some cases, that makes sense – if it’s something we really do intend to use again (be realistic here!), but wouldn’t want to pay full price for again.

10. Is it easily replaceable?

Knowing that you can relatively easily obtain your item again, if need be, makes it easier to let go of.

11. Is it broken?

This seems almost too obvious to include, but we all are likely hanging onto something that doesn’t work. Commit to fixing it within the next week, or get rid of it.

Asking these 11 decluttering questions will help you pare down to what is useful, in good condition, and what you really love. The space you free up with a decluttering exercise will undoubtedly contribute to freed up mental space as well. Give it a try!

10 Things that Clutter a Home

We know a decluttered space when we see it…it looks clean, picked up, and evokes feelings of calm. On the contrary, a cluttered environment is messy and can feel chaotic. There are some common culprits to the clutter standing between where you may be now and a clutter free space. Here are 10 things that contribute to a cluttered home:

1. Stuff on Counters

Tuck those appliances away. File or recycle papers. And, stow food in a cupboard or pantry.

2. Dishes

cluttered dishes

If you do one thing from this list, tackle those dirty dishes. It will give the illusion of an entire home that’s clean – even if it’s not. Make this part of your evening routine. You’ll be glad you did when you get to start the new day fresh – free from yesterday’s accumulation.

3. Visible Cords

There are lots of cord management products on the market (or use what you have – twist ties do the trick!) This is a simple and inexpensive fix and can really elevate the look of your space.

4. Mail

cluttered mail

The tough part with mail/paperwork is the rate at which mail comes into your home. If you’re not on top of the previous days mail, you’ll be adding to it the next day and the next day. To remedy this, come up with a simple system that includes recycling junk mail (do it right away!), and filing away remaining mail into a few categories – consider “to pay”, “to file”, or “action needed”.

5. Mismatched Containers

The goal here doesn’t need to be Pinterest worthy, but attempting a little coordination as far as container style or color can go a long way.

6. Shoes

Ensure there are shoe shelves, a drawer, or some other place to contain shoes wherever they tend to accumulate – inside the garage or front door, most likely.

7. Remote Controls

Find a basket or other container to house remote controls. Keep it on a side table or other location that’s close to where the remotes are used. Make it easy!

8. Laundry

putting away laundry

Laundry clutter can come in various forms…dirty laundry that hasn’t been put in a hamper or clean laundry that hasn’t been put away. Ask for your family’s help with this one – everyone can be responsible for putting clean laundry away and dirty clothes where they belong.

9. Knick Knacks

Do you have special collections? Great! Display them with joy. But, if, on the other hand, your knick knacks feel like just “stuff” – without meaning or even fondness, it may be time to pare down. Keep what you really like, what you would buy again, or what holds special meaning to you. Let your space provide parameters for you….allocate 1 shelf for your candles, for example.

10. Anything That Isn’t Put Away

There may not be a pattern/a rhyme or reason to these things. Maybe they = consist of tools, dishes, stray socks or toys. Here are two strategies that can help: 1. Ensure these items have a “home” and get into the habit (kids, too!) of putting things away as soon as you’re done with them. 2. Set a timer for 10 minutes and zip through each room grabbing stray things to put away. It’s amazing what can be done with a little focus and a short period of time. Living clutter free is within reach!

Love Your Linen Closet

“Love”? A little strong? Perhaps. But, opening up and peering into a decluttered and organized linen closet CAN conjure up all the happy feels. A little slice of peace and calm. Here’s how to get there…

lovely linen closet

1. Remove

Yep, just like you would in a pantry or other space, everything needs to come out first. You may discover duplicates, stained items, and things that don’t belong.

2. Purge

How many old or mismatched sets of sheets do you have? You shouldn’t need any more than 1 extra set per bed. Or, you could even get away with one set. Wash them, then put them right back on your bed. What else do you have that is unused or excess? Old quilts or comforters? How many pillows do you have vs. need? Some of these things take up lots of space, so be sure there’s a purpose for what you own and that everything gets used.

Determine what belongs in the linen closet. Be deliberate. If you have the space and it’s convenient for you to keep extra bath and personal care products here, then by all means, do so if that works for you. If not, find them a better home.

3. Contain

love your linens

Containing like items in the linen closet helps you to find what you need quickly, and prevents piles from toppling over. Not a fitted sheet folding expert? Neither am I! Put it in a bin and call it a day! You can absolutely have an organized linen closet without perfect or fussy folding.

There are lots of great containers that will work well. Just choose what you like, taking note of dimensions to be sure these sometimes narrow shelves can accommodate your selection.

4. Label

You knew that was coming, didn’t you? Unlabeled containers have a tendency to become catch-alls in the absence of labels that defines what the space is allocated for. Chalkboard labels are great for smooth surfaced containers and bin clip labels are helpful for basket materials.

Three Final Tips:

  1. Keep bulky or seldom used items on the top shelf.
  2. Be wary of “Excess Bath Towels Syndrome”. Extras that are looking a little worse for wear can be downgraded to cleaning towels.
  3. If you don’t have a linen closet, determine where to store things based on proximity to where they’re used. Towels could go in a bathroom cupboard, and an extra set of sheets could go in an under the bed storage box.

The 3 Best Organizing Products Under $25

*Disclosure: Links included in this post are amazon affiliate links. This means that, at no additional cost to you, I will earn a small commission if you click through and make a purchase.

There are certain organizing products (you know – containers, bins, baskets and the like) that I find myself turning to again and again. Their versatility, price point (under $25 – say what?!) and utility earn them blue ribbon status in my book. Whether you’re organizing a bedroom, craft room, linen closet or anywhere in between, you’ll get the most bang for your buck from these 3 organizing products.

1. Drawer Dividers

Messy dresser drawer? Cluttered utensil drawer? Drawer dividers to the rescue! They’re such a simple solution, yet sometimes overlooked. Drawer dividers come in lots of sizes and materials – bamboo, plastic, clear acrylic. They divide your drawer either lengthwise or widthwise and create delineation between items.

Dividers are affordable, easy to install – many are spring loaded and adjustable – and stay in place well. Just be sure to measure your drawer height and length to be sure you’re getting dividers that fit.

drawer divider in use
drawer divider in kitchen

2. Multi Purpose Bins

The Container Store is the mecca of all things organization. There you will find Multi Purpose Bins which come in different colors and sizes and are great for organizing almost anything! I love putting different categories of cleaning products in them and stowing them under sinks or using them for coloring books, paper, and kids’ artwork, per the 3 center clear bins in the below photo. Can’t beat the price point, either. They’re less than $7 even for the largest size.

multi purpose bins for organizing

3. Lazy Susan Rounders

These spinning containers allow easy access to things in cupboards or pantry corners – great for housing oils, vinegars, and other round items. They’re also ideal for holding personal care and beauty products. The below rounder is divided, which can be helpful – depending on your needs.

Rounders are available with high sides to contain taller products without tipping, or with lower sides. Materials include clear acrylic, many colors of plastic, and even pretty bamboo. You can find small ones for tight spaces or very large diameter rounders.

I’d encourage you to consider one of these space solutions for one of your problem areas. Endless versatility and they won’t break the bank. Win-win!